

Using Remote monitoring mode
Workflow
Remote monitoring mode can be started and stopped using the following procedure.
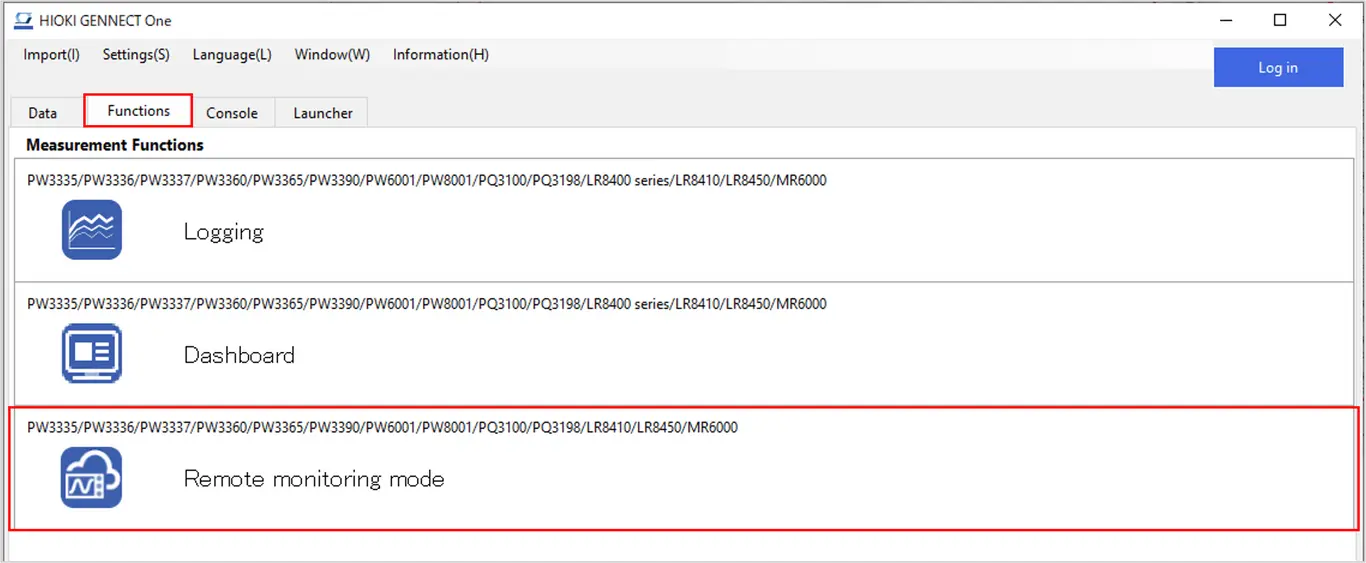
Starting Remote monitoring mode
- Click the [Function] tab and then click [Remote monitoring mode].
Checking the connection environment and logging in
The [Preparations for starting remote monitoring mode] window will be displayed.
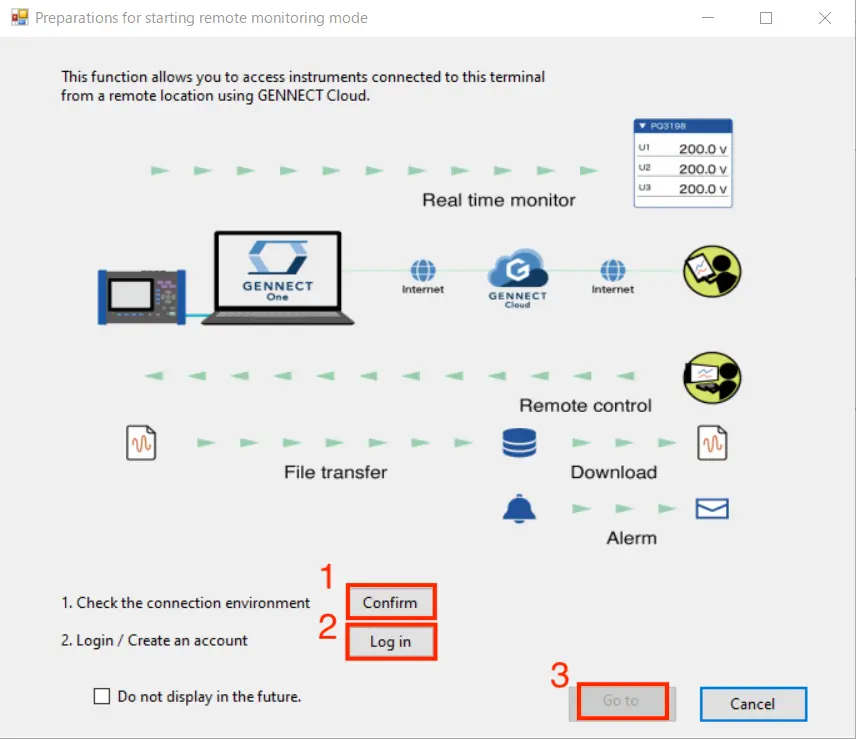
- Click the [Confirm] button next to [Check the connection environment] as necessary.
You can verify that your environment supports use of remote monitoring mode. If it doesn’t, you won’t be able to use remote monitoring mode.
If your network has access restrictions, please consult your network administrator and consider removing the restrictions.
Network Requirements :
Communication using outbound TCP: 443 port and TLS intercommunication must be allowed to AWS IoT ("a314maxk2739k7-ats.iot.ap-northeast-1.amazonaws.com").
Supported example :
-1. Disable SSL Decryption and other functions for "a314maxk2739k7-ats.iot.ap-northeast-1.amazonaws.com" (port 443)
-2. Allow access to this service if it is restricted by filtering software
- Click the [Log in] button to log in to GENNECT Cloud.
This step can be skipped if you’re already logged in. If you don’t have a GENNECT Cloud account, please create one first.
-
Click the [Next] button.
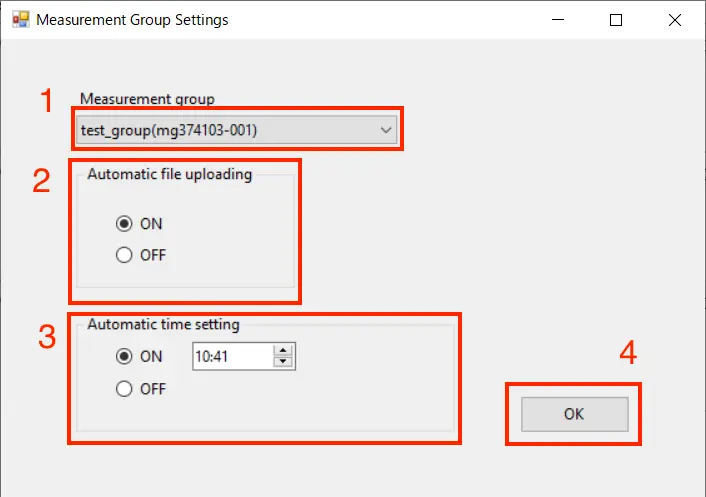
Setting the measurement group
All data in GENNECT Cloud belongs to a measurement group, which is the unit by which data is managed.
For more information about measurement groups, see the What are measurement groups?.
-
Select the measurement group to which you wish to upload GENNECT acquisition data and instrument data files.
-
Configure automatic file uploads. This setting allows generated instrument data files to be uploaded to the cloud.
ON: Upload instrument data files automatically. Please note that some instrument models and settings will result in larger file sizes, which will use large amounts of mobile data. Automatic uploading is limited to files that are 128 MB or less in size.
OFF: Store instrument data files on the computer and do not upload them automatically. -
Configure automatic time synchronization.
Enabling this setting will synchronize instruments’ clocks once a day. Depending on the instrument model and firmware version, synchronizing the time may cause measurement or integration to stop. In this case, a new file will be created when the time is synchronized. See below for more information.
- Click the [OK] button.
Selecting Instruments
For operating instructions, see below.
* You can select up to three instruments with GENNECT Cloud Free, or up to eight instruments with GENNECT Cloud Standard/Pro.
Selecting channels
For operating instructions, see below.
* The number of channels that can be selected is as follows:
| Plan | Number of channels (per instrument) |
|---|---|
| Free | 30 |
| Standard | 30 |
| Pro | 100 |
Exiting remote monitoring mode
When you exit remote monitoring mode, uploading of GENNECT acquisition data and instrument data files to the cloud will stop.
Window layout
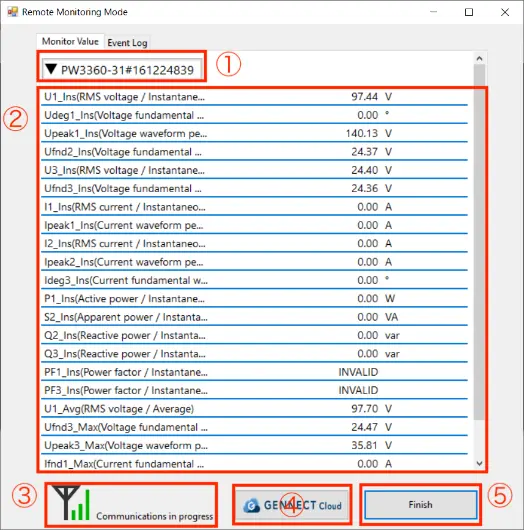
① Instrument name display
Click here to hide/unhide area ②.
② Measurement channel and measured value display
This area displays the current measured value for each channel.
③ Internet connection environment icon
If an Internet connection is available, the icon shown in the screenshot will be shown.
If not, the follow icon will be shown.

④ "Open in browser" button
Click this button to open the GENNECT Cloud web application.
⑤ Exit button
Click this button to exit Remote monitoring mode.